How to Track Email Opens for Free Using Google Analytics
If you ever find yourself in charge of an email marketing campaign, chances are you will need to track open rates for your emails. Tracking open rates are an important step in measuring the success of your campaign.
We also know from this course that there are tools which make it easy to track open rates. Using a email service like MailChimp means that the service provider will take care of tracking for you, automatically presenting you with reports. Another option is using a service like bananatag which will also automatically track your emails for you. The downside for both of these options is that if you want to send any substantial amount of emails to your customers you’ll have to pay for it.
After learning about email marketing in our course, I decided that it would be beneficial for the business I work for to begin an email marketing campaign. What I found, though, was that we already had an automated email system linked with our point of sale system and I did not have a budget either to pay for an email service provider. I still needed to track my email open rates though, so I wondered what I would do.
After some soul searching (I did a lot of research online combined with trial and error), I finally found a solution and it is beautiful: Google Analytics
In class, we had discussed using Google Analytics for website tracking which is its most obvious use. However, I found through my research that it can do so much more—including tracking email open rates. I will aim to build upon what I learned online by creating a clear and concise guide so that hopefully you can do it too.
4 Steps for Tracking your Email Opens with Google Analytics
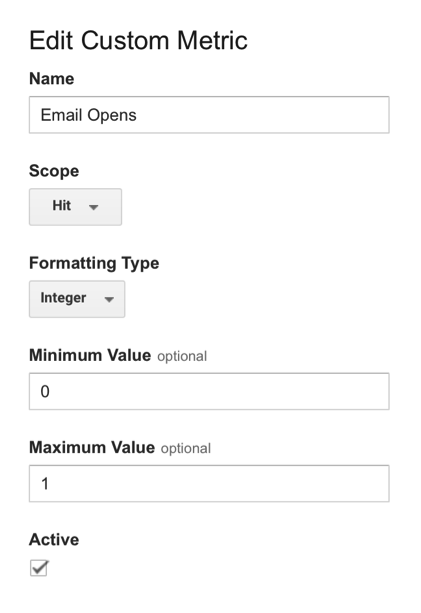
Step 1: Let your Analytics account know that it should be looking for email opens by setting a new customer definition. You can name it whatever you want, but make sure that you set the scope to “hit”, formatting type to “integer” and the Minimum and Maximum Values to 0 and 1 respectively.


Step 2: Create your tracking code to be inserted into your email.

The basic skeleton of what this code should include looks like this:
<img src= “https://www.google-analytics.com/collect?v=1&tid=?&cid=CLIENT_ID_NUMBER&t=?&ec=?&ea=?&cs=?&cm=?&cn=?” width=1 height=1>
You need to fill in the blanks. For more information about what each of these sections mean visit: https://developers.google.com/analytics/devguides/collection/protocol/v1/email#client-id-cid
The only sections that you absolutely have to include are the following:
tid: this is the tracking ID for your site. You can find this by going to the Property Settings section located under Admin.
t: this tells your analytics account how to track your email. You want to enter “event” here because emails should be tracked as an event as we set up earlier.
ec: this is your event category. This is how your will classify your email campaigns and differentiate them. If you want to track different emails at the same time, you want to make sure they each have a unique category.
ea: this tells analytics what action the link will trigger. You will want to enter “open” here to track email open rates.
Step 3: Insert your tracking code anywhere in your email.
Whenever anyone opens one of your emails, this code will trick the email client into thinking there is an image pixel to load. When the client attempts to load the image pixel, it will then signal to Google Analytics that the email has been opened.
Step 4: Track your results
The first place to track your results in the Reporting tab is by looking at Real-Time Events. Here you can see in real time the number of people who currently have your email open. You can also see a count of the number of email opens in the last thirty minutes as well. You’ll notice that I have two different emails being tracked by two different event categories.

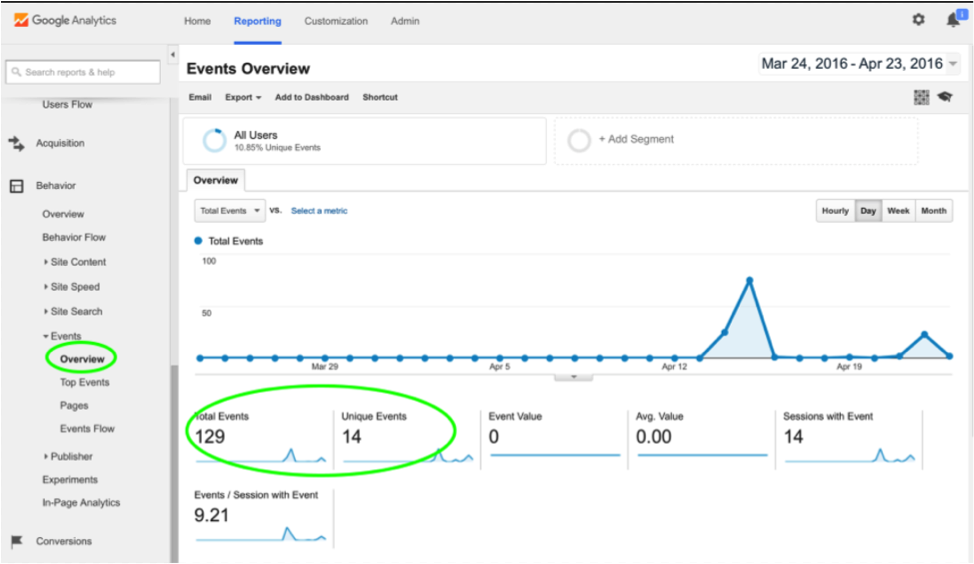
Another place that you can look for results reporting is under the Overview tab of the Behavior section. It takes about 1 day for the previous day’s results to be aggregated here, so be patient. But once there, you can see an overview of all of your email opens and segment by things like date and hour.

Now you should have all the tools you need to start tracking email opens using Google Analytics. Happy tracking!
Jamie Fujinaka is a marketing student at the University of Wisconsin-Madison. You can connect with him on LinkedIn.


